
HDM
Version 2.4 · Harry Konstas
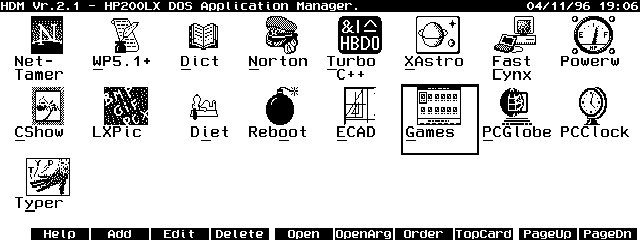
Description
A great way to manage DOS applications on your LX. Can manage and organize up to 200 DOS programs with control over zoom mode, screen, serial port, power management, etc. Built with PAL so it has the look and feel of a built-in application. The newest version was enhanced by the author and Thaddeus Computing to make it even more powerful. Freeware.
Technical details
- File
hdm240.zip- Size
- 69.4 KB
- Format
- .zip
- Year
- 1998
- Added to S.U.P.E.R.
- 1998-09-12
- Files inside
- 8
- Author
- Harry Konstas
- Path
anonftp/pub/hdm240.zip
How to install it
What to send to the palmtop saves 27.8 KB
These are the files you need. You can send them from the package contents below.
-
DM.EXE→ A:\SOFT programa de DOS 1.0 KB -
DM.ICN→ A:\SOFT icono, junto a su aplicación 200 B -
HDMCNV.EXE→ A:\SOFT programa de DOS 14.1 KB -
DEMO.BAT→ A:\SOFT programa de DOS 85 B -
DEMO.DAT→ A:\_DAT configuración 15.3 KB -
HDM.EXE→ A:\SOFT programa de DOS 39.4 KB
No need to put
ICONS.ZIP, HDM.DOC:
they are manuals, source code or supporting material. Read them here and save 27.8 KB on a 1 MB disk.
Steps
- Copy DM.EXE, HDMCNV.EXE, DEMO.BAT, HDM.EXE to A:\SOFT. They are DOS programs: run them from the DOS icon, or add A:\SOFT to the PATH in C:\AUTOEXEC.BAT to call them by name.
- Copy DEMO.DAT to A:\_DAT, where the 200LX looks for configuration. Open it with Memo and adjust it before use.
- If you edit a configuration file on the palmtop, make sure you leave a newline at the end: some programs swallow the last line without saying a word.
- The .ICN files are icons: they go in the same folder as their application.
Derived from the package contents and the 200LX conventions. It installs to A: on purpose: C: is a RAM disk and every byte there is memory taken from the system.
The author's instructions
Installation:

 If you are upgrading from a previous version of HDM, please
run the HDMCNV conversion utility (included in this ZIP)
before you install this new version of HDM! The conversion
utility will convert all your application data stored into
the c:\_dat\dosmgr.dat file so you won't need to re-enter
them.


 If you plan to use HDM from within System Manager there's
an icon supplied for this. What I did is installed HDM
as a new application to the System manager, and moved its
icon to the top left corner of the screen (first icon).

                    !!IMPORTANT!!:
To install HDM as an application in the System Manager,
add the '|' character at the end of the filename so that
System Manager launches HDM with the maximum possible memory.
HDM needs AT LEAST 100k of free memory!

For example, if DM.EXE resides in A:\HDM, you should
enter the following line:

 a:\hdm\dm.exe|        < notice the '|' character!

 You can use HDM from both Application manager and DOS.

 With the growing number of PAL applications that are having the
same look & feel of the built-in applications, HDM will be
very usefull.


 Here are the contents of the HDM.ZIP file:

 HDMCNV.EXE:  IMPORTANT!!! Run this first if you are
              upgrading from a previous version of HDM.

 DEMO.BAT:    Demo batch file. This will give you a quick idea
              on what HDM is all about.

 DEMO.DAT:    Demo application list data-file.

 DM.EXE:      The HDM launcher written by Rob Koenis.
 HDM.EXE:     The HDM executable. Must run DM.EXE to run it.
 DM.ICN:      The HDM Icon.
 HDM.DOC:     This document file.

 ICONS.ZIP:   A small collection of icons you can add to your
              icon directory. If you don't have an icon
              directory you should create one for HDM.

…
Literal excerpt from HDM.DOC, exactly as it came in the package.
Package contents
Send to my palmtop
The palmtop must be waiting before you press the button, or the transfer will fail. It is the palmtop that announces it is ready, not the other way round.
Your browser cannot talk to the serial port. Direct sending uses the Web Serial API, which only exists in Chrome, Edge and Opera on desktop — not in Firefox, Safari or any mobile browser.
Download the file with the button above and copy it to the palmtop your usual way.