
LXTemp - a palmtop thermometer
Version ?? · Stephan Luettjohann
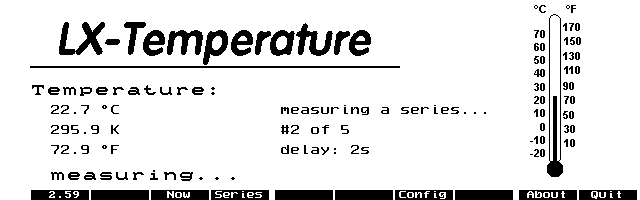
Description
LXTemp allows you to use a simple circuit attached to the serial port of the palmtop to measure the temperature. Detailed information about this excellent idea on Stephan Luettjohann's homepage .
Technical details
- File
lxtemp.zip- Size
- 85.4 KB
- Format
- .zip
- Year
- 2001
- Added to S.U.P.E.R.
- 2002-01-22
- Files inside
- 12
- Author
- Stephan Luettjohann
- Path
anonftp/pub/lxtemp.zip
How to install it
What to send to the palmtop saves 11.6 KB
These are the files you need. You can send them from the package contents below.
-
GNUPLOT.BAT→ A:\SOFT programa de DOS 33 B -
CALIBR.EXE→ A:\SOFT programa de DOS 24.5 KB -
LXTEMP.CFG→ A:\_DAT configuración 510 B -
LXTEMP.EXE→ A:\SOFT programa de DOS 53.8 KB -
LXTEMP.ICN→ A:\SOFT icono, junto a su aplicación 200 B -
LXTEMPAB.EXE→ A:\SOFT programa de DOS 49.1 KB -
LXTEMPAB.ICN→ A:\SOFT icono, junto a su aplicación 200 B
No need to put
BATT.LXT, README.DOC, TEMP.LXT, THERMO.GNU, THERMO.LXT:
they are manuals, source code or supporting material. Read them here and save 11.6 KB on a 1 MB disk.
Steps
- Copy GNUPLOT.BAT, CALIBR.EXE, LXTEMP.EXE, LXTEMPAB.EXE to A:\SOFT. They are DOS programs: run them from the DOS icon, or add A:\SOFT to the PATH in C:\AUTOEXEC.BAT to call them by name.
- Copy LXTEMP.CFG to A:\_DAT, where the 200LX looks for configuration. Open it with Memo and adjust it before use.
- If you edit a configuration file on the palmtop, make sure you leave a newline at the end: some programs swallow the last line without saying a word.
- The .ICN files are icons: they go in the same folder as their application.
Derived from the package contents and the 200LX conventions. It installs to A: on purpose: C: is a RAM disk and every byte there is memory taken from the system.
The author's instructions
hardware setup of the thermometer as well as of the speed of
your palmtop and the speed of the program. If you want to know
more about these values, have a look at the theory of the
thermometer on my homepage.
To calibrate your thermometer, you should start lxtemp.exe and
choose calibration mode in the config dialog. Then take a
reference thermometer, e.g. a Hg-Thermometer, and measure by
pressing NOW two different temperatures which are far enough
away from each other. By pressing now at a certain temperature
in calibration mode, lxtemp will not show you a temperature,
but will show you a certain time. Write down the temperature of
your reference thermometer and the time shown by lxtemp. Then
do it with another temperature, which is not close to your
first temperature. After having done so, you have two
temperature values and two time values. Quit lxtemp and start
calibr.exe. Then you are quested to type in your two
temperatures and the two times. Doing so, calibr.exe will give
you values for m and b, which you can edit in lxtemp.cfg.
Note that calibration is not so easy. When you change your
thermometer to another temperature, make sure that you waited
long enough, so that the thermometer got to the same
temperature the surrounding air has. Press several times on
NOW, to see if the displayed time changes or stays stabile.
Probably you should press NOW at a certain temperature
several times and calculate the middle of all displayed time
values.


GNUPLOT.BAT

Using lxtemp you are able to measure a series of temperatures.
These temperature values can be written into a specified file
and if you want, they can be graphically displayed after the
measurement by gnuplot. Gnuplot.bat contains the command-line
of gnuplot. If you have gnuplot, you can edit gnuplot.bat to
…
Literal excerpt from README.DOC, exactly as it came in the package.
Package contents
Send to my palmtop
The palmtop must be waiting before you press the button, or the transfer will fail. It is the palmtop that announces it is ready, not the other way round.
Your browser cannot talk to the serial port. Direct sending uses the Web Serial API, which only exists in Chrome, Edge and Opera on desktop — not in Firefox, Safari or any mobile browser.
Download the file with the button above and copy it to the palmtop your usual way.